Creamy No-Bake Red Velvet Cheesecake Bars
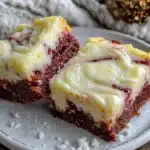
These creamy no-bake red velvet cheesecake bars feature a silky cream cheese filling with a vibrant red velvet swirl and a crunchy chocolate wafer crust, perfect for a quick and impressive dessert.
- Prep Time: 30 minutes
- Cook Time: 0 minutes
- Total Time: 4 hours 30 minutes
- Yield: 16 bars 1x
- Category: Dessert
- Cuisine: American
Ingredients
Scale
- 1 ½ cups (150g) chocolate wafer cookies or graham crackers, finely crushed
- 5 tablespoons (70g) unsalted butter, melted
- 2 tablespoons (25g) granulated sugar
- 16 ounces (450g) cream cheese, softened (full-fat)
- ¾ cup (90g) powdered sugar
- 1 teaspoon vanilla extract
- 1 cup (240ml) cold heavy cream
- ½ cup (60g) red velvet cake mix
- 2 tablespoons (30ml) buttermilk or milk
- 1 tablespoon cocoa powder
- Red food coloring (optional)
Instructions
- Crush 1 ½ cups (150g) of chocolate wafer cookies into fine crumbs using a food processor or by placing them in a zip-top bag and smashing with a rolling pin.
- Mix the crumbs with 5 tablespoons (70g) melted unsalted butter and 2 tablespoons (25g) granulated sugar until the mixture resembles wet sand.
- Evenly press the crumb mixture into the bottom of an 8×8-inch pan. Use the back of a spoon or a flat-bottomed glass to compact it firmly. Refrigerate while preparing the filling.
- In a large bowl, beat 16 ounces (450g) softened cream cheese with ¾ cup (90g) powdered sugar until smooth and creamy. Add 1 teaspoon vanilla extract.
- In a separate bowl, whip 1 cup (240ml) cold heavy cream until stiff peaks form. Gently fold the whipped cream into the cream cheese mixture.
- In a small bowl, mix ½ cup (60g) red velvet cake mix with 2 tablespoons (30ml) buttermilk or milk and 1 tablespoon cocoa powder until smooth. Add a few drops of red food coloring if desired.
- Spread about two-thirds of the cheesecake filling evenly over the chilled crust.
- Dollop spoonfuls of the red velvet batter over the surface.
- Add the remaining cheesecake filling on top.
- Using a butter knife or skewer, gently swirl the layers to create a marbled effect without overmixing.
- Cover the pan with plastic wrap and refrigerate for at least 4 hours or overnight until fully set.
Notes
Use room temperature cream cheese for smooth blending. Whip cold heavy cream until stiff peaks form. Use a light hand when swirling to maintain the marbled effect. Chill bars for at least 4 hours or overnight for best results. Dip knife in hot water and wipe between cuts for clean slices. For dairy-free, substitute coconut cream and dairy-free cream cheese. For gluten-free, use gluten-free cookies or almond flour crust.
Nutrition
- Serving Size: 1 bar (1/16th of rec
- Calories: 210
- Sugar: 12
- Fat: 15
- Carbohydrates: 16
- Protein: 3
Keywords: no-bake, red velvet, cheesecake bars, easy dessert, quick dessert, no oven, creamy, swirl, chocolate crust