The school open house was in three hours and I’d completely forgotten I was supposed to bring dinner for the teacher appreciation table. Everyone else would be bringing those beautiful, layered casseroles and homemade lasagnas that take all afternoon. I had a pack of chicken thighs, some rice I bought in bulk, and honestly, a minor panic attack starting to brew in my chest. My kitchen looked like a small disaster zone, with homework papers and permission slips scattered across the counter where I’d planned to cook.
I mean, I stood there for a solid minute just staring into the fridge, hoping a fully prepared meal would magically appear. No such luck. But then I remembered this ridiculously simple one-pan chicken and rice bake my friend Sarah had mentioned once. She swore it was foolproof, and let me tell you, I needed foolproof in that moment. I grabbed the chicken, tossed it in a dish with some rice and broth, and basically prayed to the dinner gods. I didn’t even have time to sear the chicken first—just threw it all in together and hoped for the best.
The thing is, it worked. Like, really worked. The chicken came out tender, the rice soaked up all that savory goodness, and there was practically no cleanup. The teachers at the open house actually asked for the recipe, and I had to admit it was the dish I’d thrown together in a panic. Maybe you’ve been there—staring at the clock, wondering how you’re going to get a decent meal on the table when you have zero time and even less energy. That’s exactly why this one-pan chicken and rice bake has become my go-to. It saved me that night, and it keeps saving me on every busy school night since.
Why You’ll Love This Recipe
Let me be honest with you—I’ve tested this recipe about a dozen times now, tweaking the liquid ratio, playing with the oven temperature, and trying different seasoning blends. I wanted to make sure it was absolutely bulletproof for those nights when you just can’t afford a cooking disaster. After all that trial and error, I can confidently say this is the version that works every single time. It’s not just another chicken and rice recipe—it’s the one that’ll get you out of a dinner jam without breaking a sweat.
- Quick & Easy: This one-pan chicken and rice bake comes together in under an hour with just 10 minutes of active prep. You can literally dump everything in a dish and walk away.
- Simple Ingredients: No fancy grocery trips needed. You likely already have chicken, rice, broth, and a few pantry staples in your kitchen right now.
- Perfect for Busy School Nights: Great for those evenings when homework, sports practice, and after-school activities leave zero time for complicated cooking.
- Crowd-Pleaser: My kids actually ask for seconds, and my husband always packs the leftovers for lunch the next day. It’s that good.
- Unbelievably Delicious: The rice gets perfectly fluffy, the chicken stays juicy, and the whole thing has this cozy, comforting flavor that feels like a hug in a bowl.
What makes this recipe different from all the other chicken and rice bakes out there? It’s the technique—or rather, the lack of complicated technique. Most recipes tell you to sear the chicken first, sauté aromatics, and deglaze the pan. Not this one. You just layer everything in a single baking dish, pour over the broth, and let the oven do all the work. The rice absorbs all that seasoned liquid while the chicken cooks on top, creating this incredible one-pan meal that tastes like you spent hours on it.
This recipe isn’t just good—it’s the kind that makes you close your eyes after the first bite. It’s comfort food at its finest, but without the stress and mountain of dishes. Perfect for feeding a hungry family without losing your mind on a Tuesday night.
What Ingredients You Will Need
This one-pan chicken and rice bake uses simple, wholesome ingredients that work together to deliver big flavor without any fuss. Most of these are pantry staples, so you can probably make this right now without a trip to the store.
- Chicken thighs (bone-in, skin-on, about 6 pieces) — I prefer thighs for this recipe because they stay juicy and flavorful even with the longer bake time. Bone-in adds more flavor to the rice. You can use boneless skinless thighs if that’s what you have, just reduce the bake time by about 10 minutes.
- Long-grain white rice (1½ cups, uncooked) — Basmati or jasmine work beautifully here. Avoid instant rice or short-grain varieties, as they’ll turn mushy. I’ve tested this with brown rice too, but you’ll need to add about 20 minutes to the bake time and an extra ½ cup of broth.
- Chicken broth (3 cups, low-sodium) — This is where most of the flavor comes from, so use a good quality broth. I like the Better Than Bouillon brand because it gives a rich, savory base that really makes the rice sing. You can use vegetable broth in a pinch, but the flavor won’t be as deep.
- Onion (1 medium, diced) — Adds sweetness and depth as it cooks into the rice. Yellow or white onions both work fine.
- Garlic (4 cloves, minced) — Because garlic makes everything better. Don’t skip this one.
- Butter (2 tablespoons, unsalted) — Adds richness and helps the rice stay fluffy. You can substitute olive oil if you prefer, but butter gives a better flavor.
- Dried thyme (1 teaspoon) — Earthy and slightly floral, thyme pairs beautifully with chicken. Fresh thyme works too—use 1 tablespoon of fresh leaves.
- Dried rosemary (½ teaspoon, crushed) — Just a little goes a long way. Rub it between your fingers before adding to release the oils.
- Paprika (1 teaspoon) — Adds a subtle smokiness and gives the chicken a beautiful golden color. Smoked paprika is even better if you have it.
- Salt and black pepper (to taste) — Don’t be shy with the seasoning. The rice needs a good amount of salt to taste flavorful.
- Fresh parsley (for garnish, optional) — Adds a pop of color and freshness at the end. Totally optional but nice for presentation.
Equipment Needed
You don’t need a fancy kitchen to make this one-pan chicken and rice bake. Here’s what you’ll need:
- 9×13 inch baking dish — This is the perfect size for this recipe. A 3-quart casserole dish works too. I use my Pyrex glass baking dish and it’s never let me down.
- Large mixing bowl — For whisking together the broth and seasonings before pouring over the dish. You can skip this and just mix in the baking dish if you’re in a hurry, but pre-mixing ensures even seasoning.
- Chef’s knife and cutting board — For dicing the onion and mincing the garlic. A sharp knife makes this job so much easier.
- Measuring cups and spoons — Accuracy matters here, especially with the rice-to-liquid ratio. Don’t eyeball it.
- Aluminum foil — For covering the dish during the first part of baking. This traps steam and helps the rice cook evenly.
If you don’t have a 9×13 dish, you can use a large cast-iron skillet or a Dutch oven. Just make sure it’s oven-safe and has a lid or can be covered with foil. I’ve made this in my Lodge cast-iron skillet before and it worked beautifully—the even heat distribution actually made the rice extra fluffy.
Preparation Method
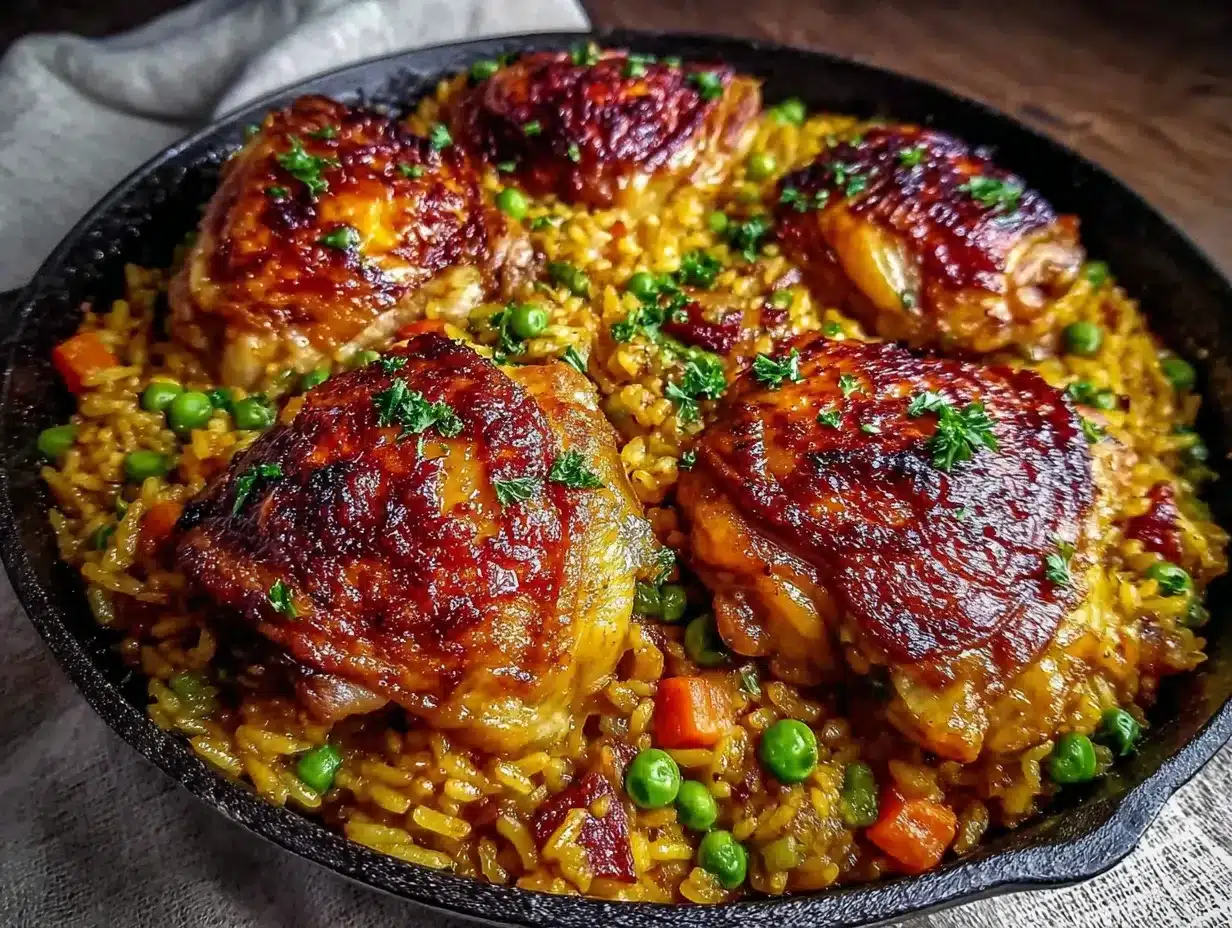
Alright, let’s get cooking. I’ll walk you through every step so you can nail this one-pan chicken and rice bake on your first try.
- Preheat your oven to 375°F (190°C). While it’s heating up, take your chicken thighs out of the fridge and let them sit on the counter for about 10 minutes. This helps them cook more evenly. Pat them dry with paper towels—this is important for getting that golden skin later.
- Season the chicken generously. Sprinkle the paprika, ½ teaspoon of salt, and ¼ teaspoon of black pepper all over the chicken thighs. Rub it in with your hands. Don’t skip this step—the seasoning on the chicken is what flavors the whole dish as it cooks.
- Prep your aromatics. Dice the onion into small, even pieces. Mince the garlic cloves. If you’re feeling fancy, you can also chop some fresh parsley for garnish later, but that’s totally optional.
- Layer the rice and aromatics in your baking dish. Spread the uncooked rice evenly across the bottom of your 9×13 dish. Scatter the diced onion and minced garlic over the rice. Dot the butter in small pieces across the top. This might look weird now, but trust the process—the butter will melt into the rice as it bakes and make everything delicious.
- Add the broth and seasonings. In a large measuring cup or bowl, whisk together the chicken broth, dried thyme, and crushed rosemary. Pour this mixture evenly over the rice. Give the dish a gentle shake to help everything settle. The rice should be completely submerged in liquid—if it looks a little dry, add a splash more broth.
- Arrange the chicken on top. Place the seasoned chicken thighs skin-side up on top of the rice mixture. Try to space them out evenly so they’re not touching each other too much. This helps the skin get crispy and ensures even cooking.
- Cover and bake for 35 minutes. Tightly cover the dish with aluminum foil. Make sure the edges are sealed so steam doesn’t escape. Pop it in the oven and set a timer. This covered baking time is crucial—it allows the rice to cook through and absorb all that flavorful liquid without drying out.
- Uncover and bake for another 20-25 minutes. After 35 minutes, carefully remove the foil. The rice should look tender and most of the liquid should be absorbed. Return the dish to the oven, uncovered, and bake until the chicken skin is golden and crispy. The internal temperature of the chicken should reach 165°F (74°C) when checked with a meat thermometer. Don’t skip the thermometer check—it’s the only way to be sure your chicken is safely cooked without being overdone.
- Let it rest before serving. Remove the dish from the oven and let it rest for 5-10 minutes. This is really important—the rice will continue to absorb any remaining liquid and the chicken will reabsorb its juices, making everything more tender. Cover it loosely with foil during this rest time to keep it warm.
- Fluff and serve. Use a fork to gently fluff the rice before serving. Sprinkle with fresh parsley if you’re using it. Spoon the rice onto plates and top with a chicken thigh. That’s it—you’ve got a complete, delicious meal with just one pan to wash.
Cooking Tips & Techniques
After making this one-pan chicken and rice bake more times than I can count, I’ve picked up a few tricks that make a real difference. Let me share them with you so you can avoid my early mistakes.
Don’t skip the foil cover. I know it’s tempting to just throw everything in the oven uncovered and hope for the best, but that first covered bake is non-negotiable. Without it, the rice won’t cook through properly—you’ll end up with crunchy, undercooked rice while the chicken is already done. I learned this the hard way when I was in a rush and ended up with a sad, crunchy dinner.
Use a meat thermometer. Chicken thighs are forgiving, but they can still be undercooked or dry. I always use my Thermapen instant-read thermometer to check for 165°F (74°C) at the thickest part. It takes two seconds and gives me total peace of mind.
Watch your liquid ratio. Different rice varieties absorb different amounts of liquid. If you’re using a different type of rice than I recommend, you may need to adjust the broth. The general rule is 2 parts liquid to 1 part rice for white rice, but I add an extra half cup because the chicken also releases some moisture as it cooks. If your rice looks dry after the covered bake, add a splash of broth before returning to the oven uncovered.
Let the dish rest. I cannot stress this enough. The rest time is when the magic happens. The rice finishes absorbing liquid, the chicken juices redistribute, and everything comes together perfectly. If you serve it right away, you’ll have soupy rice and dry chicken. Be patient—it’s worth the wait.
For extra crispy skin, you can broil the chicken for the last 2-3 minutes of cooking. Just keep a close eye on it—broilers work fast and can burn things in seconds. I do this when I want that crackly, golden skin that everyone fights over.
Variations & Adaptations
One of the best things about this one-pan chicken and rice bake is how adaptable it is. Here are some variations I’ve tried and loved:
- Creamy Mushroom Version: Add one can of cream of mushroom soup to the broth mixture and stir in 8 ounces of sliced mushrooms. The soup makes the rice extra creamy and gives it that classic comfort food vibe. My family goes crazy for this version.
- Mexican-Inspired Twist: Swap the thyme and rosemary for cumin, chili powder, and a pinch of cayenne. Use half broth and half salsa for the liquid. Top with shredded cheese during the last 10 minutes of baking and serve with fresh cilantro and lime wedges. This is my go-to when I’m craving something with a little kick.
- Lemon Herb Version: Add the zest of one lemon and 2 tablespoons of fresh lemon juice to the broth. Throw in some fresh dill or oregano along with the thyme. The lemon brightens up the whole dish and makes it feel lighter—perfect for spring evenings.
- Vegetable-Packed Version: Add 1 cup of frozen peas and carrots, or chopped bell peppers, to the rice layer before pouring in the broth. You can also throw in some chopped spinach during the last 10 minutes of baking. It’s an easy way to sneak more veggies into dinner without anyone complaining.
- Gluten-Free Adaptation: This recipe is naturally gluten-free as written, but double-check your chicken broth label—some brands contain gluten. Use tamari instead of soy sauce if you’re adding any, and you’re good to go.
I personally love the lemon herb version for summer nights when I want something bright and fresh. It feels completely different from the original, but it’s just as easy to throw together.
Serving & Storage Suggestions
This one-pan chicken and rice bake is a complete meal on its own, but here are some ideas for serving and storing it.
Serving: Serve warm, straight from the baking dish. I like to spoon the rice onto plates first and then top each portion with a chicken thigh. A simple green salad with a lemon vinaigrette is the perfect side—the acidity cuts through the richness of the dish. Steamed broccoli or roasted green beans also pair beautifully. If you’re feeling extra hungry, some crusty bread to soak up any remaining juices is never a bad idea.
Storage: Leftovers keep well in the refrigerator for up to 4 days. Store in an airtight container. The flavors actually get better overnight as the rice continues to absorb all those seasonings. I often double the recipe on purpose just so we have leftovers for lunch the next day.
Reheating: The best way to reheat is in the oven at 350°F (175°C) for about 15 minutes, covered with foil to prevent drying out. You can also use the microwave in 30-second bursts, but the rice won’t be quite as fluffy. Add a splash of broth or water before reheating to restore moisture.
Freezing: This dish freezes surprisingly well. Let it cool completely, then transfer to a freezer-safe container. It will keep for up to 3 months. To reheat, thaw overnight in the fridge and then bake at 350°F (175°C) for 20-25 minutes, covered. The rice might be slightly softer after freezing, but the flavor is still fantastic.
Nutritional Information & Benefits
Here’s a rough estimate of the nutritional content per serving (one chicken thigh with about 1 cup of rice):
- Calories: Approximately 520-580
- Protein: 35-40g
- Carbohydrates: 45-50g
- Fat: 18-22g
- Fiber: 1-2g
- Sodium: 600-800mg (varies with broth)
This meal is a great source of lean protein from the chicken, which helps keep you full and supports muscle health. The rice provides steady energy from complex carbohydrates, perfect for fueling busy kids and adults alike. Chicken thighs contain iron and B vitamins, while the onions and garlic offer immune-supporting antioxidants.
If you’re watching your sodium intake, use low-sodium broth and go easy on the added salt. For a lower-carb option, you can swap the rice for cauliflower rice, but you’ll need to reduce the bake time significantly—check it after 20 minutes. This recipe is naturally dairy-free if you use olive oil instead of butter, and it’s gluten-free as long as your broth is certified gluten-free.
Conclusion
Look, I know there are a million chicken and rice recipes out there. But this one-pan chicken and rice bake is different. It’s the recipe I turn to on the busiest, most chaotic school nights when I have zero energy left to cook. It’s the recipe that makes me look like I have my life together when I’m actually just barely hanging on. And honestly? That’s exactly what we all need sometimes.
I hope you give this recipe a try and make it your own. Maybe you’ll add extra garlic like I do, or throw in whatever vegetables are lurking in your crisper drawer. That’s the beauty of a simple, forgiving recipe—it works with whatever you’ve got. The next time you’re staring at the clock, feeling that familiar dinner panic creeping in, remember this dish. It’s got your back.
If you make this one-pan chicken and rice bake, I’d love to hear how it turned out. Drop a comment below and let me know what variations you tried, or tag me in your photos on social media. Your feedback helps other busy parents find recipes that actually work. Happy cooking, and here’s to more easy, stress-free dinners!
Frequently Asked Questions
Can I use chicken breasts instead of thighs?
Yes, you can use boneless, skinless chicken breasts, but they cook faster and can dry out more easily. Reduce the covered bake time to 25 minutes and check the internal temperature early. I recommend pounding the breasts to an even thickness so they cook evenly.
Why is my rice still crunchy after baking?
Crunchy rice usually means there wasn’t enough liquid or the dish wasn’t covered tightly enough. Make sure your broth covers the rice completely before baking, and seal the foil tightly around the edges. If your oven runs hot, the liquid might evaporate too quickly, so check after 30 minutes and add a splash of broth if needed.
Can I make this recipe in advance?
Absolutely! You can assemble the entire dish up to 24 hours ahead of time. Just cover and refrigerate. When you’re ready to bake, add about 10-15 minutes to the covered bake time since you’re starting from cold. The rice may need a little extra liquid, so keep an extra ½ cup of broth on hand.
What can I use instead of chicken broth?
Vegetable broth works fine, or you can use water with an extra bouillon cube dissolved in it. For a richer flavor, try using half broth and half cream of chicken soup (thinned with a little milk). Just watch the salt content if you’re using canned soup.
Can I add vegetables to the dish?
Yes! Frozen peas and carrots, diced bell peppers, or sliced zucchini all work well. Add them to the rice layer before pouring in the broth. If you’re adding leafy greens like spinach or kale, stir them in during the last 10 minutes of baking so they don’t get too mushy.
Pin This Recipe!

Easy One-Pan Chicken and Rice Bake for Busy School Nights

A foolproof one-pan chicken and rice bake that comes together in under an hour with just 10 minutes of active prep. Perfect for busy school nights when you need a delicious, comforting meal without the stress and mountain of dishes.
- Prep Time: 10 minutes
- Cook Time: 55-60 minutes
- Total Time: 1 hour 5-10 minutes
- Yield: 6 servings 1x
- Category: Main Course
- Cuisine: American
Ingredients
- 6 bone-in, skin-on chicken thighs (about 6 pieces)
- 1½ cups long-grain white rice (uncooked, such as basmati or jasmine)
- 3 cups low-sodium chicken broth
- 1 medium onion, diced
- 4 cloves garlic, minced
- 2 tablespoons unsalted butter
- 1 teaspoon dried thyme
- ½ teaspoon dried rosemary, crushed
- 1 teaspoon paprika
- Salt and black pepper to taste
- Fresh parsley for garnish (optional)
Instructions
- Preheat your oven to 375°F (190°C). Take chicken thighs out of the fridge and let them sit on the counter for about 10 minutes. Pat them dry with paper towels.
- Season the chicken generously with paprika, ½ teaspoon salt, and ¼ teaspoon black pepper. Rub it in with your hands.
- Dice the onion into small, even pieces. Mince the garlic cloves.
- Spread the uncooked rice evenly across the bottom of a 9×13 inch baking dish. Scatter the diced onion and minced garlic over the rice. Dot the butter in small pieces across the top.
- In a large measuring cup or bowl, whisk together the chicken broth, dried thyme, and crushed rosemary. Pour this mixture evenly over the rice. Give the dish a gentle shake to help everything settle. The rice should be completely submerged in liquid.
- Place the seasoned chicken thighs skin-side up on top of the rice mixture, spacing them out evenly.
- Tightly cover the dish with aluminum foil. Bake for 35 minutes.
- After 35 minutes, carefully remove the foil. Return the dish to the oven, uncovered, and bake for another 20-25 minutes, until the chicken skin is golden and crispy and the internal temperature reaches 165°F (74°C).
- Remove the dish from the oven and let it rest for 5-10 minutes, covered loosely with foil.
- Use a fork to gently fluff the rice before serving. Sprinkle with fresh parsley if desired. Spoon the rice onto plates and top with a chicken thigh.
Notes
Don’t skip the foil cover—it’s essential for cooking the rice properly. Let the dish rest before serving to allow the rice to absorb remaining liquid and the chicken to reabsorb juices. For extra crispy skin, broil for the last 2-3 minutes. If using brown rice, add 20 minutes to bake time and an extra ½ cup of broth. Leftovers keep in the refrigerator for up to 4 days and freeze well for up to 3 months.
Nutrition
- Serving Size: 1 chicken thigh with
- Calories: 520580
- Sugar: 23
- Sodium: 600800
- Fat: 1822
- Saturated Fat: 68
- Carbohydrates: 4550
- Fiber: 12
- Protein: 3540
Keywords: one-pan chicken and rice, easy chicken bake, busy weeknight dinner, family dinner, chicken thighs, rice bake, school night dinner