My sister-in-law wasn’t trying to impress me. I’d stopped by on a Tuesday afternoon in July to borrow a ladder—ours had mysteriously vanished into the garage abyss—and the smell hit me before I even got through the screen door. Sweet, toasted sugar with a hint of salt, like the inside of a fancy bakery but coming from her tiny, cluttered kitchen. She was standing there in cutoff shorts, barefoot, stirring something in a bowl with the casual focus of someone who definitely wasn’t making the best ice cream I’d ever eaten.
“Oh, that,” she said when I asked, barely looking up. “Just some frozen stuff. My kids are picky.”
She handed me a spoonful from the spatula, and honestly, I almost dropped the ladder. It was creamy, rich, and that salt hit right at the end—like a little wink from the universe. No ice cream maker. No fancy equipment. Just a bowl, a whisk, and this completely unbothered energy that made the whole thing feel like a secret. I stood there eating straight from her freezer for the next ten minutes, and she just laughed.
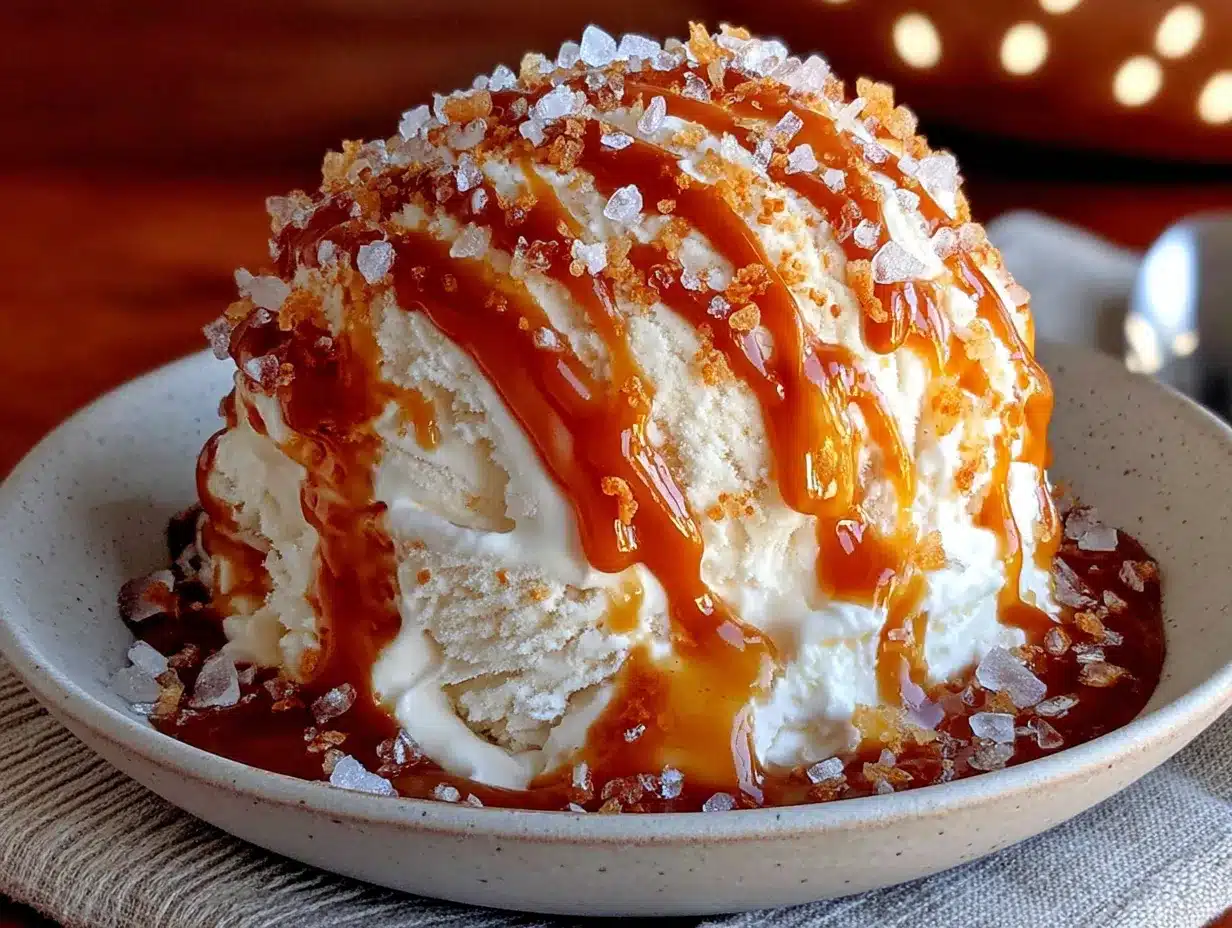
That’s the thing about Summer’s Best No-Churn Salted Caramel Ice Cream. It doesn’t need a big production. It doesn’t need a special occasion. It just needs you to want something incredible on a hot day, and it delivers every single time. I’ve made it at least a dozen times since that Tuesday, and it still feels like I’m getting away with something. You know that feeling when you find a recipe that’s way too easy for how good it turns out? That’s this one, exactly.
Why You’ll Love This Recipe
Let me tell you why this no-churn salted caramel ice cream has become my go-to for every summer gathering, lazy afternoon, and emergency dessert situation. It’s not just another frozen treat—it’s the kind that makes people close their eyes after the first bite.
- No Ice Cream Maker Required — I mean it. No churning, no freezing bowls overnight, no special attachments. Just a whisk and some patience. This is the kind of recipe that democratizes homemade ice cream for everyone.
- Simple Ingredients You Already Have — Heavy cream, sweetened condensed milk, sugar, butter, and salt. That’s it. No corn syrup, no stabilizers, no weird stuff you have to hunt down at three different stores. Your pantry is probably already ready.
- Perfect for Hot Summer Days — When the temperature hits 90 and you need something cold fast, this is your answer. It comes together in about 20 minutes of active time, then the freezer does the rest of the work.
- Crowd-Pleaser Guaranteed — I’ve brought this to four different barbecues this summer, and every single time someone asks for the recipe. Kids love it, adults love it, and people who claim they don’t like sweets suddenly have a second scoop.
- That Salted Caramel Balance — The trick is in the salt. It cuts through the sweetness just enough so you get that rich, buttery caramel flavor without it being cloying. It’s the kind of balance that feels intentional, like a chef planned it.
What makes this recipe different from all the other no-churn recipes out there? It’s the technique for the caramel. Most recipes just swirl store-bought sauce into the cream mixture, and honestly, that works fine. But this version uses a homemade caramel that you cook yourself—simple, yes, but it gives you control over the depth of flavor. You can take it to a dark amber for a more complex, almost bitter caramel, or keep it light and buttery. It’s your call, and that makes all the difference.
This isn’t just good ice cream. It’s the kind that makes you forget about the heat, forget about your to-do list, and just sit there with a spoon, completely content. That’s the whole point of summer, right?
What Ingredients You Will Need
This recipe uses simple, wholesome ingredients to deliver that rich, creamy texture and bold salted caramel flavor without any fuss. Most of these are pantry staples, which is exactly what you want when a craving hits on a Tuesday afternoon.
For the Ice Cream Base
- 2 cups heavy cream (cold) — This is the backbone of your no-churn ice cream. The high fat content is what gives you that luscious, scoopable texture without churning. I prefer Organic Valley or Horizon for consistent results.
- 1 can (14 ounces) sweetened condensed milk — This replaces the sugar and stabilizers in traditional ice cream. It’s what makes the no-churn method work. Don’t substitute with evaporated milk—they’re not the same thing.
- 1 teaspoon vanilla extract — Pure vanilla, not imitation. It rounds out the caramel flavor beautifully. I use Nielsen-Massey Madagascar vanilla, but any good quality extract works.
- 1/4 teaspoon sea salt (plus more for finishing) — Use flaky sea salt like Maldon for the final sprinkle. It makes a difference in texture and flavor.
For the Salted Caramel Sauce
- 1 cup granulated sugar — Regular white sugar. Don’t use brown sugar here—it changes the caramel chemistry and can lead to crystallization.
- 6 tablespoons unsalted butter, cut into pieces — Salted butter works in a pinch, but unsalted gives you better control over the salt level. Let it come to room temperature before you start.
- 1/2 cup heavy cream (room temperature) — This is important. If your cream is cold when you add it to the hot caramel, it can seize up and create lumps. Let it sit out for 15 minutes.
- 1 teaspoon flaky sea salt (like Maldon) — This is for finishing. The big, crunchy flakes are what make that salted caramel experience complete.
Ingredient Tips & Substitutions
For a dairy-free version: Use full-fat coconut cream instead of heavy cream, and look for a dairy-free sweetened condensed milk (Nature’s Charm makes a good one). The texture will be slightly different—more coconut-forward, obviously—but still delicious.
For a deeper caramel flavor: Cook your sugar to a dark amber color, just before it starts to smoke. This adds a slightly bitter, toasty note that balances the sweetness beautifully. Just watch it carefully—caramel can go from perfect to burnt in seconds.
Brand recommendations: I’ve tested this with several brands of sweetened condensed milk, and Eagle Brand gives the creamiest result. For heavy cream, anything with at least 36% milk fat works—avoid ultra-pasteurized if you can find it, as it can have a slightly cooked flavor.
Equipment Needed
One of the best things about this recipe is that you probably already own everything you need. No fancy machines required.
- Large mixing bowl — For whipping the cream. Metal or glass works best because they stay cold longer.
- Hand mixer or stand mixer — You can whip cream by hand with a whisk, but it’ll take about 8-10 minutes and your arm will be sore. A hand mixer does it in 3 minutes flat. I use my KitchenAid hand mixer for this.
- Medium saucepan — For making the caramel. A heavy-bottomed pan is ideal because it distributes heat evenly and prevents hot spots that can burn your sugar.
- Candy thermometer (optional but helpful) — If you want to be precise about your caramel temperature, this is useful. Aim for 340-350°F for a medium amber color. But honestly, I usually just go by color.
- 9×5-inch loaf pan — For freezing the ice cream. Any freezer-safe container works, but a loaf pan gives you nice rectangular scoops.
- Parchment paper or plastic wrap — To line your pan and prevent sticking.
- Rubber spatula — For folding the mixtures together. A flexible one makes all the difference.
Budget-friendly alternatives: If you don’t have a hand mixer, a whisk and some elbow grease work fine—just make sure your cream is very cold. No loaf pan? Use a 2-quart freezer-safe bowl or even a plastic container. The shape doesn’t matter, just the size.
Preparation Method
Alright, let’s make some ice cream. This looks like a lot of steps, but I promise it’s straightforward. Take your time with the caramel—that’s where the magic happens.
- Make the caramel first. Place your saucepan over medium heat and add the granulated sugar in an even layer. Let it sit without stirring for about 3-4 minutes, until the edges start to melt and turn golden. Then, using a heatproof spatula or wooden spoon, gently stir the melting sugar toward the center. Keep stirring occasionally as it melts—this takes about 6-8 minutes total. You’re looking for a deep amber color, like a new penny. Don’t walk away; caramel can burn fast.
- Add the butter. Once your sugar is that beautiful amber color, remove the pan from heat and add the butter pieces all at once. The mixture will bubble up vigorously—that’s normal. Stir continuously until the butter is fully melted and incorporated. The caramel will look smooth and glossy. If you see any lumps, keep stirring; they’ll dissolve.
- Slowly add the cream. With the pan still off heat, slowly pour in the room-temperature heavy cream while whisking constantly. Again, it will bubble up—this is the exciting part. Keep whisking until the sauce is smooth and uniform. If it seizes up (gets grainy or lumpy), don’t panic. Return the pan to low heat and whisk gently until it smooths out. Remove from heat and stir in the 1/4 teaspoon sea salt. Let the caramel cool for about 20 minutes at room temperature, then transfer to a jar or bowl and refrigerate until completely cold—at least 2 hours, or overnight.
- Whip the cream. In your large mixing bowl, pour the cold heavy cream. Using a hand mixer or stand mixer with the whisk attachment, beat on medium-high speed until stiff peaks form. This takes about 3-4 minutes. You’ll know it’s ready when you lift the beaters and the cream holds its shape without drooping. Be careful not to over-whip, or you’ll end up with butter. If you accidentally go too far, add a tablespoon of cold cream and fold gently to bring it back.
- Fold in the condensed milk. In a separate bowl, whisk together the sweetened condensed milk and vanilla extract until smooth. Then, gently fold this mixture into the whipped cream using a rubber spatula. Use a cutting motion—down through the middle, up the side, and over the top—rotating the bowl as you go. Stop when there are no more white streaks. It should look like a thick, creamy cloud.
- Layer in the caramel. Get your loaf pan ready and line it with parchment paper, leaving some overhang on the sides (this makes it easier to lift out later). Spoon about one-third of the cream mixture into the pan and spread it evenly. Drizzle about one-third of your cold caramel sauce over the top. Use a knife or skewer to swirl it gently—don’t overmix, or you’ll lose the distinct ribbons of caramel. Repeat with another layer of cream mixture, more caramel, and a final swirl. Top with the remaining cream mixture and drizzle the last of the caramel on top. Sprinkle with flaky sea salt.
- Freeze. Cover the pan tightly with plastic wrap or aluminum foil. Place it in the freezer for at least 6 hours, but overnight is better. The ice cream needs that time to set up properly. I always make mine the day before I plan to serve it.
- Serve. When you’re ready to eat, take the pan out of the freezer and let it sit at room temperature for 5-10 minutes. This softens it just enough for easy scooping. Use a warm ice cream scoop (dip it in hot water first) for those perfect round scoops. Drizzle with extra caramel sauce and another pinch of flaky salt if you’re feeling fancy.
Troubleshooting tip: If your ice cream comes out too hard after freezing, it might be because your cream wasn’t whipped enough, or your caramel had too much sugar syrup. Next time, whip the cream to stiffer peaks and make sure your caramel is fully cold before adding it. If it’s already frozen and too hard, let it sit at room temperature for 15-20 minutes before serving.
Cooking Tips & Techniques
I’ve made this recipe enough times to learn a few things the hard way. Let me save you from my mistakes.
Don’t rush the caramel. The first time I made this, I cranked the heat too high trying to speed things up, and my sugar burned before it even fully melted. Low and slow is the way to go. Medium heat, patience, and constant attention. If you see wisps of smoke, you’ve gone too far—start over. Burnt caramel tastes bitter, not complex.
Room temperature ingredients matter. I know, I know, it’s annoying to wait. But when you add cold cream to hot caramel, the temperature shock can cause the mixture to seize up into a grainy, lumpy mess. Let your cream sit out for 15 minutes. Same goes for the butter. Your future self will thank you.
Whipping cream to stiff peaks is non-negotiable. This is what creates the airy structure that makes no-churn ice cream work. If your cream is only at soft peaks, the finished ice cream will be dense and icy. You want it to hold its shape completely. When in doubt, whip an extra 30 seconds.
Swirl, don’t stir. When you add the caramel to the cream mixture, use a light hand. You want distinct ribbons of caramel throughout, not a homogeneous tan mixture. A few gentle figure-eight motions with a knife is all it takes.
Patience with freezing. I know you want to eat it right away. I get it. But if you scoop it too early, you’ll get a soft, melty mess instead of proper ice cream. Six hours minimum, overnight ideal. The texture improves as it freezes fully.
One mistake I still make: Forgetting to sprinkle the salt until after it’s frozen. Then I’m trying to press flaky salt into rock-hard ice cream, and it just bounces off. Do it before freezing. Trust me.
Timing strategy: Make the caramel and the cream mixture on the same day. While the caramel cools, whip your cream and fold in the condensed milk. By the time the caramel is cold enough to use, your base is ready. Total active time is about 20 minutes, then you just wait.
Variations & Adaptations
This recipe is flexible, and I love playing around with different flavors. Here are some variations I’ve tried and loved.
Chocolate Salted Caramel: Add 1/4 cup unsweetened cocoa powder to the sweetened condensed milk before folding it into the whipped cream. Sift it first to avoid lumps. The chocolate-caramel-salt combination is absolutely devastating—in the best way.
Vegan Coconut Caramel: Use full-fat coconut cream instead of heavy cream, and dairy-free sweetened condensed milk. For the caramel, use coconut oil instead of butter and coconut cream instead of heavy cream. The coconut flavor pairs beautifully with the caramel, and honestly, I sometimes make this version even when I’m not serving vegans.
Spiced Caramel: Add 1/2 teaspoon cinnamon and a pinch of cayenne pepper to the caramel sauce while it’s cooling. The warmth of the spice cuts through the sweetness and adds a subtle heat that lingers. It’s incredible on a hot summer night.
Nutty Caramel: Toast 1/2 cup of pecans or walnuts and chop them roughly. Fold them into the cream mixture along with the caramel. The crunch adds texture and makes it feel even more decadent.
Boozy Caramel: Add 2 tablespoons of bourbon or dark rum to the caramel after you remove it from heat. The alcohol keeps the ice cream slightly softer—perfect for scooping straight from the freezer.
My personal favorite variation: I made a batch last August with a shot of espresso added to the caramel and a sprinkle of dark chocolate shavings on top. It was like an affogato in ice cream form. My neighbor came over to borrow sugar and ended up eating three scoops on my porch. That’s the kind of impact you want.
Serving & Storage Suggestions
This ice cream is best served slightly softened, about 5-10 minutes out of the freezer. The texture should be creamy and scoopable, not rock hard. I like to serve it in chilled bowls with an extra drizzle of caramel and a pinch of flaky salt on top.
What to serve with it: This ice cream is fantastic on its own, but it also pairs beautifully with warm desserts. Try it on top of a brownie fresh from the oven, next to a slice of apple pie, or sandwiched between two chocolate chip cookies for an ice cream sandwich situation. For a simple summer dessert, serve it alongside fresh berries—the tartness cuts through the richness.
Storage: Keep the ice cream in an airtight container in the freezer. Press a piece of plastic wrap directly onto the surface before sealing the lid—this prevents ice crystals from forming. It will keep for up to 2 weeks, but honestly, it never lasts that long in my house.
Reheating the caramel: If you have leftover caramel sauce (lucky you), store it in a jar in the refrigerator for up to 2 weeks. To reheat, warm it gently in the microwave in 15-second bursts, stirring between each, or in a small saucepan over low heat. Add a splash of cream if it’s too thick.
Flavor development: The ice cream actually gets better after a day or two in the freezer. The caramel flavor deepens and melds with the cream, and the salt distributes more evenly. I’ve had a batch that was at its peak on day three—smooth, rich, and perfectly balanced.
Nutritional Information & Benefits
Let’s be real—this is a treat, not a health food. But knowing what’s in it helps you enjoy it mindfully.
Estimated per serving (1/2 cup): 380 calories, 24g fat (15g saturated), 38g carbohydrates, 4g protein, 180mg sodium. These numbers vary based on exact ingredients and portion size, obviously.
What’s actually good about it: The heavy cream provides calcium and vitamin A, and the butter in the caramel adds a small amount of vitamin A as well. The salt, if you’re using good quality sea salt, contains trace minerals like magnesium and potassium. Is that a reason to eat a whole pint? No. But it’s nice to know it’s not completely empty calories.
Dietary considerations: This recipe contains dairy and gluten-free as written. For a dairy-free version, see the variations section. It’s not low-carb—the condensed milk and sugar see to that—but you could experiment with a sugar-free sweetened condensed milk alternative if that’s your thing. I haven’t tried it, so I can’t vouch for the texture.
My personal perspective: I believe in enjoying real food in moderation. This ice cream is made with whole ingredients, no preservatives, no artificial flavors. That counts for something. I’d rather eat one perfect scoop of this than a bowl of low-fat, sugar-free frozen dessert that tastes like cardboard. Quality over quantity, always.
Conclusion
This Summer’s Best No-Churn Salted Caramel Ice Cream is the kind of recipe that makes you feel like you’re getting away with something. It’s too easy for how incredible it tastes, and that’s exactly why I keep coming back to it. No special equipment, no complicated techniques—just simple ingredients and a little patience.
I love that I can make it on a whim, that it impresses people without any stress, and that every single batch tastes like summer in a bowl. The caramel ribbons, the flaky salt, that creamy texture that melts on your tongue—it’s pure joy, and we all need more of that.
I’d love to hear how yours turns out. Did you try a variation? Add something unexpected? Let me know in the comments below. And if you share it on social media, tag me—I want to see your beautiful scoops. Now go make some ice cream. You deserve it.
Frequently Asked Questions
Can I make this without a hand mixer?
Absolutely. You can whip the cream by hand with a whisk, but it takes about 8-10 minutes of vigorous arm work. Make sure your cream is very cold, and use a large bowl to give yourself room. It’s a great arm workout, honestly.
Why did my caramel turn grainy?
Grainy caramel usually means the sugar crystallized. This can happen if you stir too early, if there’s any moisture in your pan, or if you added cold cream to hot caramel. To fix it, gently reheat the caramel with a splash of warm cream and whisk until smooth. Prevention is easier: don’t stir until the sugar starts melting, and always use room temperature cream.
How long does this ice cream keep in the freezer?
It’s best within the first week, but it will keep for up to 2 weeks if stored properly. Press plastic wrap directly onto the surface to prevent ice crystals. After 2 weeks, the texture starts to get icy and the flavor fades.
Can I use store-bought caramel sauce instead of making my own?
You can, but it won’t be the same. Homemade caramel has a deeper, more complex flavor that makes this recipe special. If you’re in a hurry, use a high-quality jarred caramel like Trader Joe’s or Stonewall Kitchen. But honestly, making your own takes 15 minutes and is worth every second.
Can I double this recipe?
Yes, but you’ll need a larger container for freezing. A 9×13-inch baking dish works well. Just make sure your bowl is big enough to hold the whipped cream—you don’t want it splattering everywhere. The caramel recipe doubles easily, too.
Pin This Recipe!
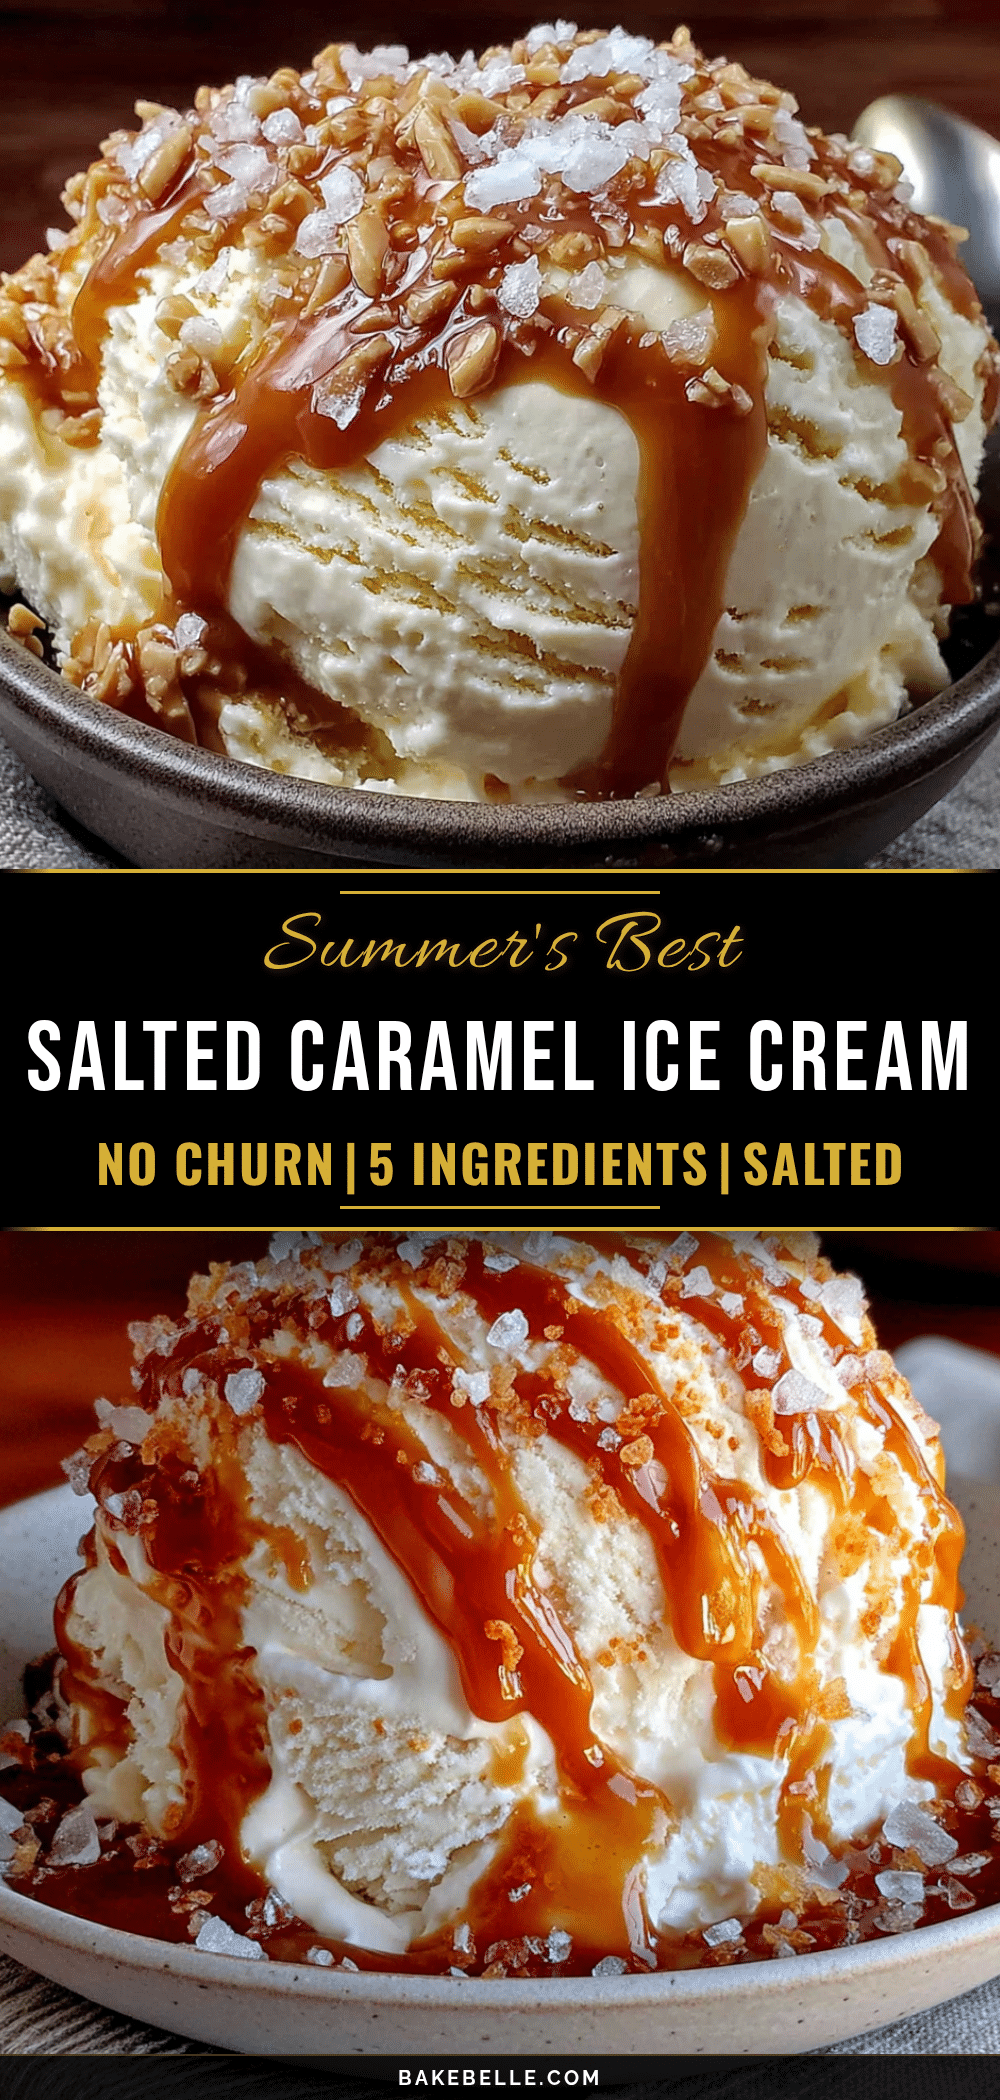
Summer’s Best No-Churn Salted Caramel Ice Cream
This no-churn salted caramel ice cream is incredibly creamy and rich, with a perfect balance of sweet and salty. It requires no ice cream maker and comes together with simple ingredients for a crowd-pleasing summer treat.
- Prep Time: 20 minutes
- Cook Time: 15 minutes
- Total Time: 6 hours 35 minutes (includes freezing)
- Yield: 8 servings 1x
- Category: Dessert
- Cuisine: American
Ingredients
- 2 cups heavy cream (cold)
- 1 can (14 ounces) sweetened condensed milk
- 1 teaspoon vanilla extract
- 1/4 teaspoon sea salt (plus more for finishing)
- 1 cup granulated sugar
- 6 tablespoons unsalted butter, cut into pieces
- 1/2 cup heavy cream (room temperature)
- 1 teaspoon flaky sea salt (like Maldon)
Instructions
- Make the caramel first. Place your saucepan over medium heat and add the granulated sugar in an even layer. Let it sit without stirring for about 3-4 minutes, until the edges start to melt and turn golden. Then, using a heatproof spatula or wooden spoon, gently stir the melting sugar toward the center. Keep stirring occasionally as it melts—this takes about 6-8 minutes total. You’re looking for a deep amber color, like a new penny. Don’t walk away; caramel can burn fast.
- Add the butter. Once your sugar is that beautiful amber color, remove the pan from heat and add the butter pieces all at once. The mixture will bubble up vigorously—that’s normal. Stir continuously until the butter is fully melted and incorporated. The caramel will look smooth and glossy. If you see any lumps, keep stirring; they’ll dissolve.
- Slowly add the cream. With the pan still off heat, slowly pour in the room-temperature heavy cream while whisking constantly. Again, it will bubble up—this is the exciting part. Keep whisking until the sauce is smooth and uniform. If it seizes up (gets grainy or lumpy), don’t panic. Return the pan to low heat and whisk gently until it smooths out. Remove from heat and stir in the 1/4 teaspoon sea salt. Let the caramel cool for about 20 minutes at room temperature, then transfer to a jar or bowl …
- Whip the cream. In your large mixing bowl, pour the cold heavy cream. Using a hand mixer or stand mixer with the whisk attachment, beat on medium-high speed until stiff peaks form. This takes about 3-4 minutes. You’ll know it’s ready when you lift the beaters and the cream holds its shape without drooping. Be careful not to over-whip, or you’ll end up with butter. If you accidentally go too far, add a tablespoon of cold cream and fold gently to bring it back.
- Fold in the condensed milk. In a separate bowl, whisk together the sweetened condensed milk and vanilla extract until smooth. Then, gently fold this mixture into the whipped cream using a rubber spatula. Use a cutting motion—down through the middle, up the side, and over the top—rotating the bowl as you go. Stop when there are no more white streaks. It should look like a thick, creamy cloud.
- Layer in the caramel. Get your loaf pan ready and line it with parchment paper, leaving some overhang on the sides (this makes it easier to lift out later). Spoon about one-third of the cream mixture into the pan and spread it evenly. Drizzle about one-third of your cold caramel sauce over the top. Use a knife or skewer to swirl it gently—don’t overmix, or you’ll lose the distinct ribbons of caramel. Repeat with another layer of cream mixture, more caramel, and a final swirl. Top with the remain…
- Freeze. Cover the pan tightly with plastic wrap or aluminum foil. Place it in the freezer for at least 6 hours, but overnight is better. The ice cream needs that time to set up properly. I always make mine the day before I plan to serve it.
- Serve. When you’re ready to eat, take the pan out of the freezer and let it sit at room temperature for 5-10 minutes. This softens it just enough for easy scooping. Use a warm ice cream scoop (dip it in hot water first) for those perfect round scoops. Drizzle with extra caramel sauce and another pinch of flaky salt if you’re feeling fancy.
Notes
For best results, use room temperature cream when adding to caramel to prevent seizing. Whip cream to stiff peaks for proper texture. Swirl caramel gently to keep distinct ribbons. Freeze at least 6 hours, preferably overnight. Let sit at room temperature 5-10 minutes before serving for easy scooping.
Nutrition
- Serving Size: 1/2 cup
- Calories: 380
- Sugar: 35
- Sodium: 180
- Fat: 24
- Saturated Fat: 15
- Carbohydrates: 38
- Protein: 4
Keywords: no-churn ice cream, salted caramel, summer dessert, easy ice cream, homemade ice cream